Flask学习笔记

官方网站:http://flask.pocoo.org/

安装

python虚拟环境

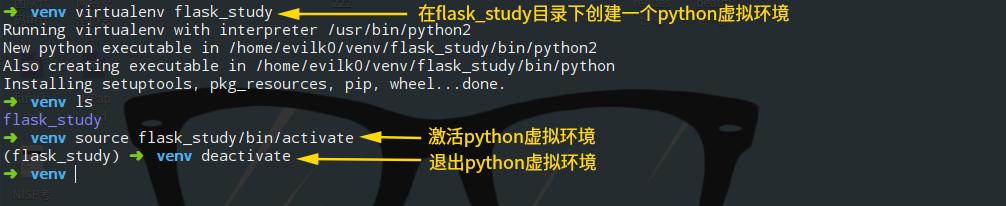
为了不污染本地系统的python开发环境,或者当开发时需要特殊版本的模块,我们可以在python虚拟环境下测试。

1

安装flask库

1
pip install flask

程序基本结构

初始化

1
2
from flask import Flask
app = Flask(__name__)

路由和视图函数

客户端将请求发给web服务器,web服务器将请求发给Flask程序实例,处理函数和url之间的映射关系称为 路由 。使用app.route修饰器将函数修饰注册成路由,例如:

1
2
3
@app.route("/")
def index():
return "<h1>Hello flask!</h1>"

我们将类似 index 这样的函数称为 视图函数 ,函数的返回值称为 响应 。路由中动态变量的默认类型为字符串,也可以指定使用其他数据类型,例如:/flask/<int:num> (还有float、path,path为字符串类型)。

启动服务器

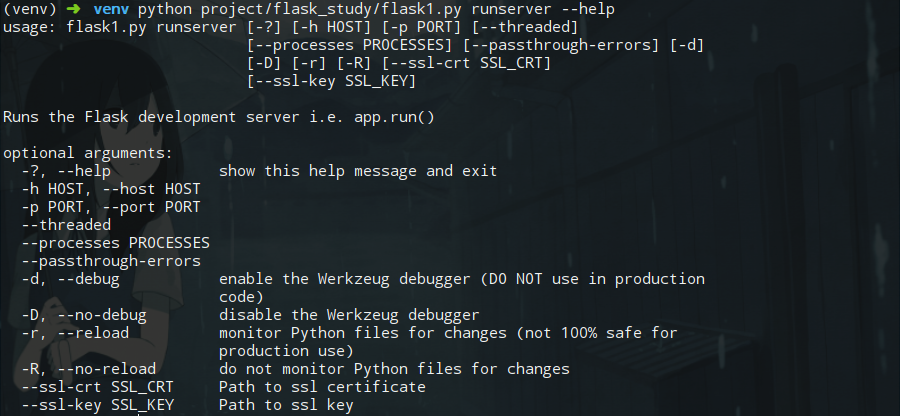
服务器启动之后,会进行轮询,等待并处理请求。可以开启 debug 模式辅助开发过程: debug=True

1
2
if __name__ == '__main__':
app.run(debug=True)

完整的程序

1
2
3
4
5
6
7
8
9
10
11
12
# 初始化
from flask import Flask
app = Flask(__name__)

# 路由和视图函数
@app.route("/<path:id>")
def index(id):
return "<h1>Hello flask! %s</h1>" %id

# 启动服务器
if __name__ == '__main__':
app.run(debug=True)

请求-响应

为了更好地处理请求对象,flask使用上下文,临时让某个特定变量在一个线程中变为全局可访问,不干扰其他线程。

请求钩子

  • before_first_request:注册一个函数,在处理第一个请求之前运行
  • before_request:注册一个函数,在处理每个请求之前运行
  • after_request:注册一个函数,在正常处理请求后,执行
  • teardown_request:注册一个函数,不管是否正常处理请求,都执行

响应

视图函数返回的响应可以是一个 三元组 ,分别是:字符串、状态码、响应头(字典类型)

1
2
3
4
5
6
7
8
9
10
11
12
13
from flask import Flask

app = Flask(__name__)

@app.route("/")
def index():
header = {
"flag" : "{1346544897551}"
}
return "Hello!",200,header

if __name__ == '__main__':
app.run(debug=True)

还可以将 response对象 作为响应

1
2
3
4
5
6
7
8
9
10
11
12
from flask import Flask
from flask import make_response
app = Flask(__name__)

@app.route("/")
def index():
response = make_response("<h1>Give you a cookie!</h1>")
response.set_cookie("flag","{test123}")
return response

if __name__ == '__main__':
app.run(debug=True)

使用 重定向 作为响应

1
2
3
4
5
6
7
8
9
10
from flask import Flask
from flask import redirect
app = Flask(__name__)

@app.route("/")
def index():
return redirect("http://freebuf.com")

if __name__ == '__main__':
app.run(debug=True)

abort 出路错误作为响应

1
2
3
4
5
6
7
8
9
10
11
12
13
from flask import Flask
from flask import abort
app = Flask(__name__)

@app.route("/user/<id>")
def index(id):
user = load_user(id)
if not user:
abort(404)
return "<h1>Hello user %s</h1>" %id

if __name__ == '__main__':
app.run(debug=True)

完整代码

1
2
3
4
5
6
7
8
9
10
11
12
13
14
15
16
17
18
19
20
21
22
23
24
25
# 初始化
from flask import Flask
from flask import request
from flask import make_response
from flask import redirect
app = Flask(__name__)

# 路由和视图函数
@app.route("/")
def index():
return "<p>You Browser is %s</p>" % request.headers.get("User-Agent") , 200 # 指定返回的状态码

@app.route("/user")
def user():
reponse = make_response("<h1>Response!</h1>")
reponse.set_cookie("username","Mochazz")
return reponse # 返回Response对象

@app.route("/404test")
def test_404():
return redirect("https://mochazz.github.io") # 重定向

# 启动
if __name__ == '__main__':
app.run(debug=True)

Flask拓展

Flask-script

使用 Flask-script ,为flask程序添加一个命令行解析器。安装命令:pip install flask-script

1
2
3
4
5
6
7
8
9
10
11
12
13
14
15
# env = python3.6.2
from flask import Flask
from flask_script import Manager
app = Flask(__name__)
manager = Manager(app)

@app.route("/user/<id>")
def index(id):
user = load_user(id)
if not user:
abort(404)
return "<h1>Hello user %s</h1>" %id

if __name__ == '__main__':
manager.run()

2

模板

渲染模板

1
2
3
4
5
6
7
8
9
10
11
12
13
# flask1.py
from flask import Flask,render_template
app = Flask(__name__)
@app.route("/")
def index():
return render_template("index.html")

@app.route("/user/<name>")
def user(name):
return render_template("user.html",username=name)

if __name__ == '__main__':
app.run(debug=True)
1
2
# templates/index.html
<h1>Flask study!</h1>
1
2
# templates/user.html
<h1>Hi,{{ username }}!</h1>

默认情况下,Flask的静态模板文件放在 templates 程序文件夹下,上面例子的文件结构如下:

1
2
3
4
|-- flask1.py
|-- templates
|-- index.html
|-- user.html

变量

模板中使用 结构表示一个变量,它是一种特殊的占位符。jinja2能识别所有类型的变量,包括:列表,字典,对象等,可以使用过滤器修改变量,过滤器添加在变量之后,中间使用竖线 “|” 分隔开,例如: 。其中 safe 过滤器需要注意一下,默认情况下jinja2会转义所有变量,但是使用safe过滤器时,就会关闭转义。更完整的过滤器可以参考文档:http://jinja.pocoo.org/docs/2.10/templates/#builtin-filters

控制结构

if 语句

1
2
3
4
5
{%  if user_name  %}
Hello , {{ user_name }}!
{% else %}
Hello , Stranger!
{% endif %}

for 循环

1
2
3
{%  for comment in comments  %}
<li>{{ comment }}</li>
{% endfor %}

(类似函数)

1
2
3
4
5
6
7
8
9
10
11
12
13
14
15
16
{%  macro render_comment(comment)  %}
<li>{{ comment }}</li>
{% endmacro %}

<ul>
{% for comment in comments %}
{{ render_comment(comment) }}
{% endfor %}
</ul>
=============== 运行结果 ===============
<ul>
<li>test1</li>
<li>test2</li>
<li>test3</li>
<li>test4</li>
</ul>

我们可以将重复使用的宏保存在单个文件中,然后导入 import

1
2
3
4
5
6
{% import 'macro.html' as macro %}
<ul>
{% for comment in comments %}
{{ macro.render_comment(comment) }}
{% endfor %}
</ul>

可以将多个重复的模板代码写入单个文件,然后在需要的文件中包含 include

1
{%  include "base.html"  %}

或者使用模板继承 extends

1
2
3
4
5
6
7
8
9
10
11
12
13
14
15
16
17
18
19
20
21
22
23
24
<!-- template/base.html -->
<!DOCTYPE html>
<html lang="en">
<head>
{% block head %}
<meta charset="UTF-8">
<title>{% block title %}{% endblock %}</title>
{% endblock %}
</head>
<body>
{% block body %}
{% endblock %}
</body>
</html>
======================================================
<!-- template/index.html -->
{% extends "base.html" %}
{% block head %}
{{ super() }}{% endblock %}
{% block title %}Index{% endblock %}

{% block body %}
<h1>Index page!</h1>
{% endblock %}

Flask-Bootstrap

自定义错误页面

1
2
3
4
5
6
7
@app.errorhandler(404)
def page_not_found(e):
return render_template("404.html"),404

@app.errorhandler(500)
def internal_server_error(e):
return render_template("500.html"),500

链接

使用 url_for("user",name="john",_external=True) ** (或者使用 **app.add.url_route() )获取动态链接,例如:http://localhos:5000/user/john

静态文件

默认设置下,flask从根目录中名为 static 文件夹中寻找静态文件(html、css、javascript文件等),例如: url_for("static",filename="css/style.css",_external=True)

Web表单

使用 request.form 能获取POST请求中与表单相关的数据,使用 Flask-WTF 拓展,可以简化对Web表单的处理,安装方法:pip install flask-wtf

CSRF保护

为了实现CSRF防护,Flask-WTF需要设置一个密钥,Flask-WTF用这个密钥生成加密令牌,再用令牌安装请求表单中数据的真伪。设置方法如下:

1
2
app = Flask(__name__)
app.config['SECRET_KEY'] = 'It is so secret'

加密的强度取决于密钥的机密性,更安全的做法是,将密钥保存在环境变量中,然后导入使用。

数据库

Flask-SQLAchemy数据库URL

数据库引擎 URL
MySQL mysql://username:password@hostname/database
Postgres postgresql://username:password@hostname/database
SQLite(Unix) sqlite:////absolute/path/to/database
SQLite(Windows) sqlite:////c:/absolute/path/to/database
1
2
3
4
apt install python3-setuptools
apt install libmysqld-dev
apt install python3.6-dev
pip install mysqlclient
1
2
3
4
5
6
7
8
9
10
11
# config.py
DIALECT = "mysql"
DRIVER = "mysqldb" # 仅这里的驱动名不一样
USERNAME = "root"
PASSWORD = "toor"
HOST = "127.0.0.1"
PORT = "3306"
DATABASE = "db_demo1"

SQLALCHEMY_TRACK_MODIFICATIONS = False
SQLALCHEMY_DATABASE_URI = "{}+{}://{}:{}@{}:{}/{}?charset=utf8".format(DIALECT,DRIVER,USERNAME,PASSWORD,HOST,PORT,DATABASE)
1
pip install PyMySQL
1
2
3
4
5
6
7
8
9
10
11
# config.py
DIALECT = "mysql"
DRIVER = "pymysql" # 仅这里的驱动名不一样
USERNAME = "root"
PASSWORD = "toor"
HOST = "127.0.0.1"
PORT = "3306"
DATABASE = "db_demo1"

SQLALCHEMY_TRACK_MODIFICATIONS = False
SQLALCHEMY_DATABASE_URI = "{}+{}://{}:{}@{}:{}/{}?charset=utf8".format(DIALECT,DRIVER,USERNAME,PASSWORD,HOST,PORT,DATABASE)

创建表

1
2
3
4
5
6
7
8
9
10
11
12
13
14
15
16
17
18
19
20
21
22
23
24
25
26
27
28
from flask import Flask,render_template
from flask_sqlalchemy import SQLAlchemy
import config

app = Flask(__name__)
app.config.from_object(config)
db = SQLAlchemy(app=app)

# create table article(
# id int primary key autoincrement,
# title varchar(100) not null,
# content text not null,
# )
class Article(db.Model):
__tablename__ = "article"
id = db.Column(db.Integer,primary_key=True,autoincrement=True)
title = db.Column(db.String(100),nullable=False)
content = db.Column(db.Text,nullable=False)

db.create_all()

@app.route("/",methods = ["GET","POST"])
@app.route("/index/",methods = ["GET","POST"])
def index():
return render_template("index.html")

if __name__ == "__main__":
app.run(debug=True)

增删改查

  • 增加

    1
    2
    3
    article1 = Article(title="mochazz",content="test") # 先实例化对象
    db.session.add(article1)
    db.session.commit()
  • 查询

    1
    2
    3
    # select * from article where id=1;
    data = Article.query.filter(Article.id == 1).all()[0] # 列表中包含一个Article对象
    print("title:{},content:{}".format(data.title,data.content))
  • 修改

    1
    2
    3
    4
    5
    # update article set title="Mochazz" where id=1;
    # 先查询,再修改,再进行事务提交
    data = Article.query.filter(Article.id == 1).all()[0]
    data.title = "EvilK0"
    db.session.commit()
  • 删除

    1
    2
    3
    4
    5
    # delete from article where id=2;
    # 先查询,再删除查询到的对象,再进行事务提交
    data = Article.query.filter(Article.id == 1).all()[0]
    db.session.delete(data)
    db.session.commit()
  • 外键约束

    1
    2
    3
    4
    5
    6
    7
    8
    9
    10
    11
    12
    13
    14
    15
    16
    17
    18
    19
    20
    21
    22
    23
    24
    25
    26
    27
    28
    29
    30
    31
    32
    from flask import Flask,render_template
    from flask_sqlalchemy import SQLAlchemy
    import config

    app = Flask(__name__)
    app.config.from_object(config)
    db = SQLAlchemy(app=app)

    # create table user(
    # id int primary key autocrement,
    # username varchar(100) not null,
    # )
    # create table article(
    # id int primary key autoincrement,
    # title varchar(20) not null,
    # content text not null,
    # author_id int ,
    # foreign key `author_id` references user.id,
    # )

    class User(db.Model):
    __tablename__ = "user"
    id = db.Column(db.Integer,primary_key = True,autoincrement = True)
    username = db.Column(db.String(100),nullable = False)

    class Article(db.Model):
    __tablename__ = "aticle"
    id = db.Column(db.Integer,primary_key=True,autoincrement=True)
    title = db.Column(db.String(20),nullable=False)
    content = db.Column(db.Text,nullable=False)
    author_id = db.Column(db.Integer,db.ForeignKey('user.id'))
    db.create_all()

可以借助Navicat来查看对应的数据表项,linux破解Navicat如下:

1
2
# 当删除.navicat64目录后,再次运行Navicat会重新计算试用期
rm -rf /home/evilk0/.navicat64

Flask视屏课程

文章作者: Mochazz
文章链接: https://mochazz.github.io/2018/04/11/flask/
版权声明: 本博客所有文章除特别声明外,均采用 CC BY-NC-SA 4.0 许可协议。转载请注明来自 Mochazz's blog